Local Businesses Blog in Texas

Category: Window Cleaning Service Page 1 of 2

How To Clean Exterior Windows Safely – Squeaky Clean Windows


Window Cleaning Service Southlake TX  Safety should always be a top priority when cleaning exterior windows to prevent accidents and injuries.

In this comprehensive guide, we’ll explore step-by-step instructions and safety tips for cleaning exterior windows safely:

1. Assess the Situation:

Before starting the cleaning process, assess the condition of the exterior windows and the surrounding area. Take note of any obstacles, such as trees, power lines, or uneven terrain, that may pose a safety hazard. Determine whether the windows are accessible from the ground or if you’ll need to use a ladder or other equipment to reach them safely.

2. Gather the Necessary Tools and Equipment:

Make sure you have all the tools and equipment you’ll need for cleaning exterior windows safely. This may include:

  • Extension ladder or telescoping pole
  • Squeegee with an extension pole attachment
  • Bucket filled with warm water and window cleaning solution
  • Microfiber cloths or lint-free towels
  • Safety harness or fall protection equipment (for working at heights)
  • Safety goggles or glasses
  • Work gloves
  • Non-slip shoes or boots
  • Window cleaning solution (commercial or homemade)
  • Scrubbing pad or sponge
  • Rubber gloves (for handling cleaning solutions)
  • Protective clothing (long-sleeved shirt, pants)

3. Check the Weather Forecast:

Choose a day with mild weather conditions for cleaning exterior windows. Avoid cleaning windows on windy or rainy days, as these conditions can make the task more challenging and increase the risk of accidents. Overcast days or early mornings are ideal for exterior window cleaning, as the sun is less intense, and the cleaning solution has more time to work before drying.

4. Secure the Area:

Before starting the cleaning process, secure the area around the windows to prevent accidents and injuries. Clear away any obstacles or debris from the ground below the windows and create a safe working zone. Use caution tape or cones to mark off the area and alert others to the cleaning activity.

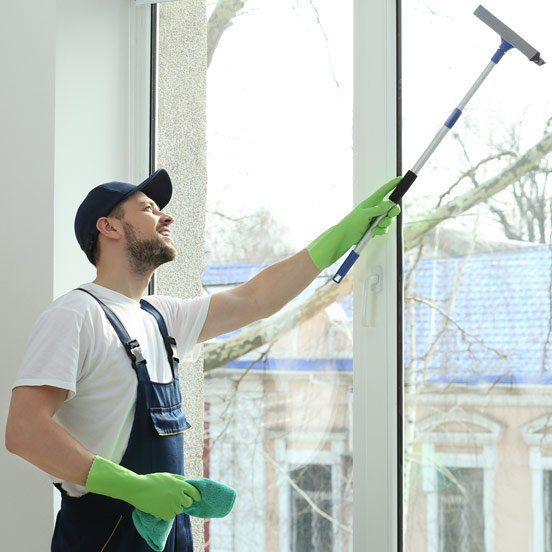
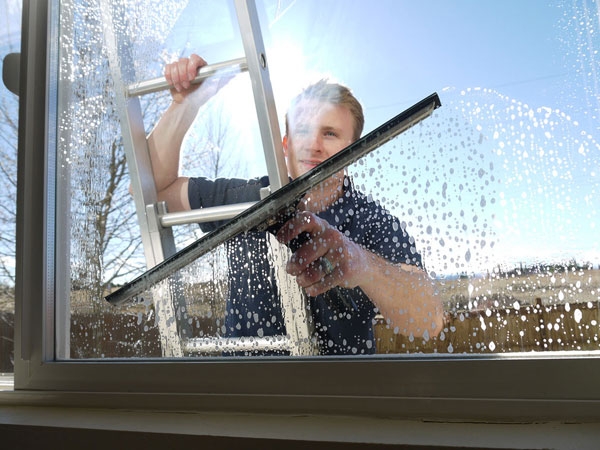
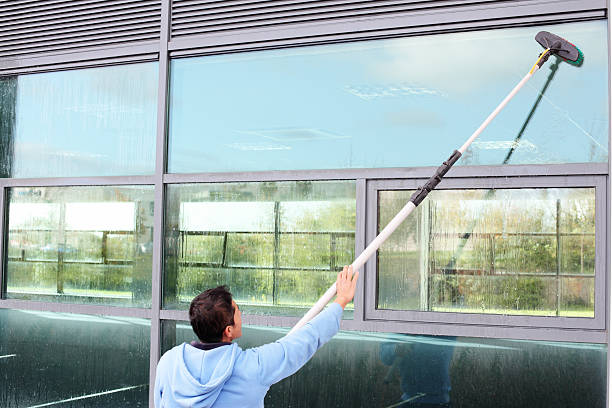
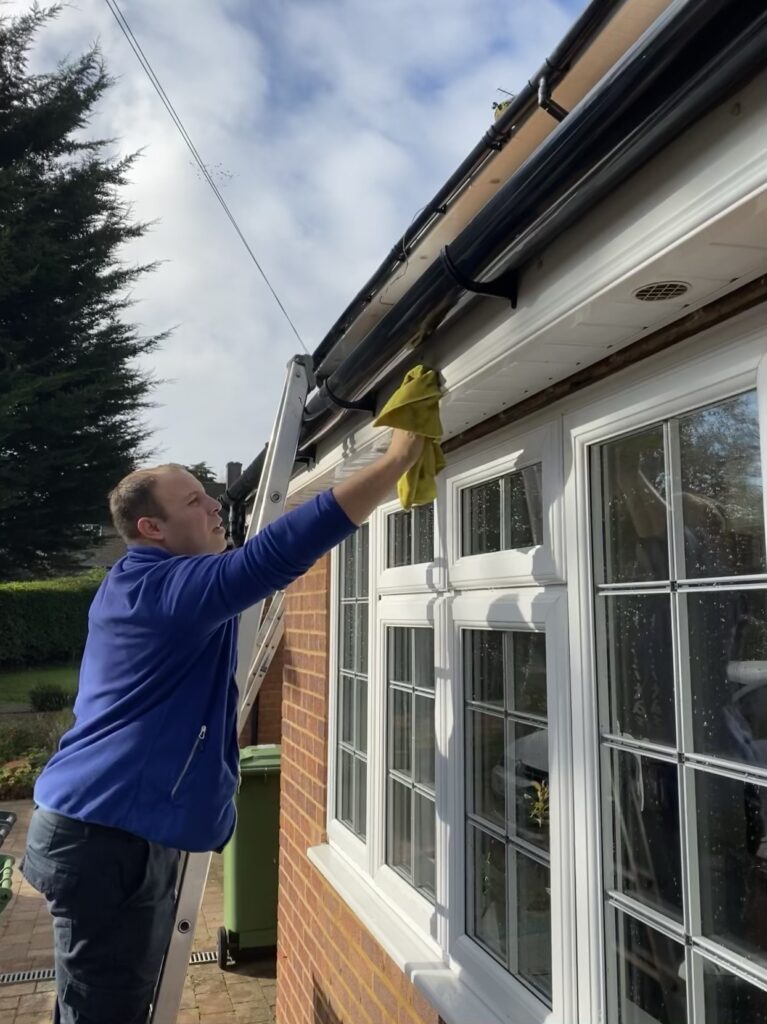
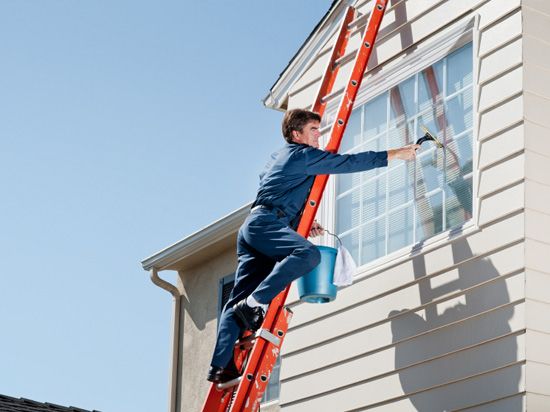
5. Use a Stable Ladder or Extension Pole:

If you need to use a ladder to reach high or elevated windows, choose a stable, properly positioned ladder with non-slip feet. Place the ladder on a flat, level surface and secure it against the building to prevent tipping or shifting. Alternatively, use a telescoping pole with an attachment for reaching high windows safely from the ground.

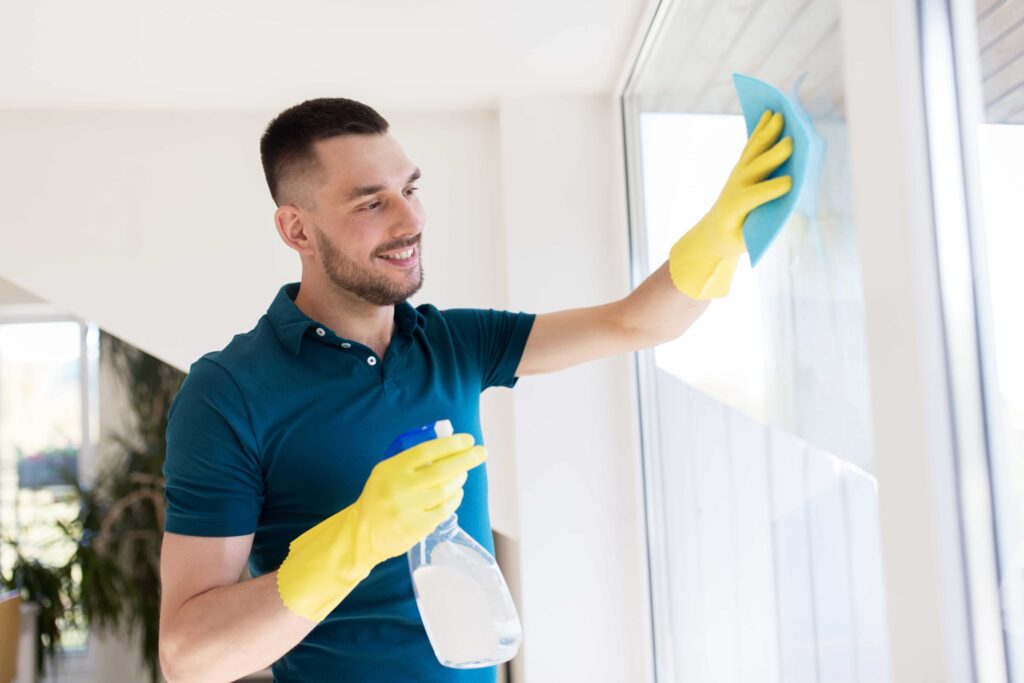
6. Wear Personal Protective Equipment (PPE):

Protect yourself from potential hazards by wearing appropriate personal protective equipment (PPE). This may include safety goggles or glasses to protect your eyes from splashes or debris, work gloves to protect your hands, and non-slip shoes or boots to prevent slips and falls.

7. Work from Top to Bottom:

When cleaning exterior windows, start at the top and work your way down to prevent streaks and drips from forming on already cleaned areas. Use a scrubbing pad or sponge to apply the cleaning solution to the window surface, working in small sections at a time.

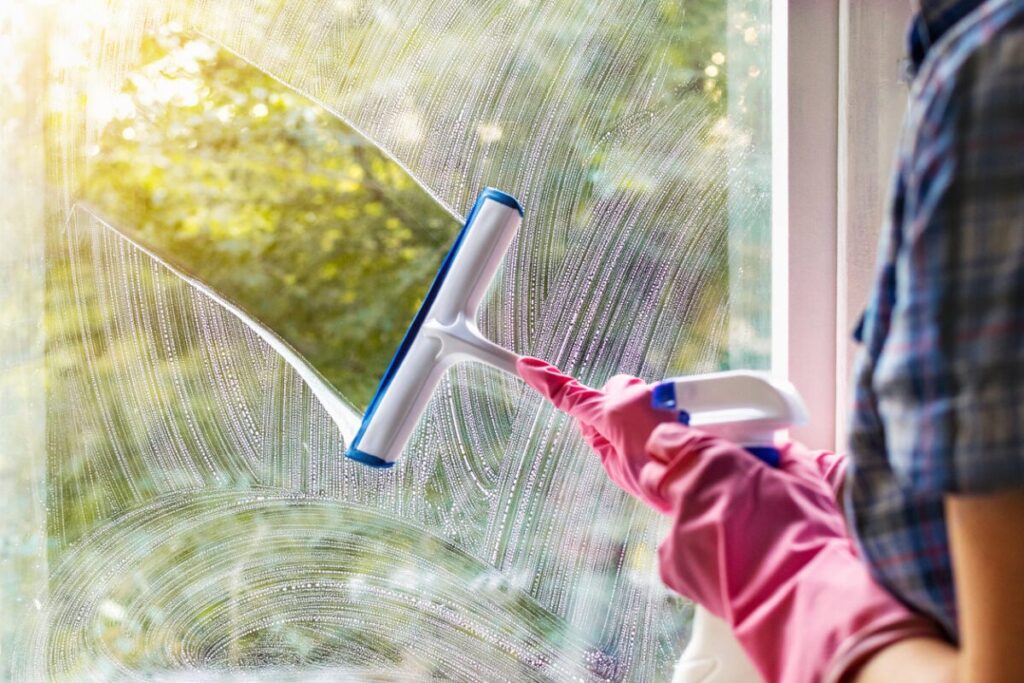
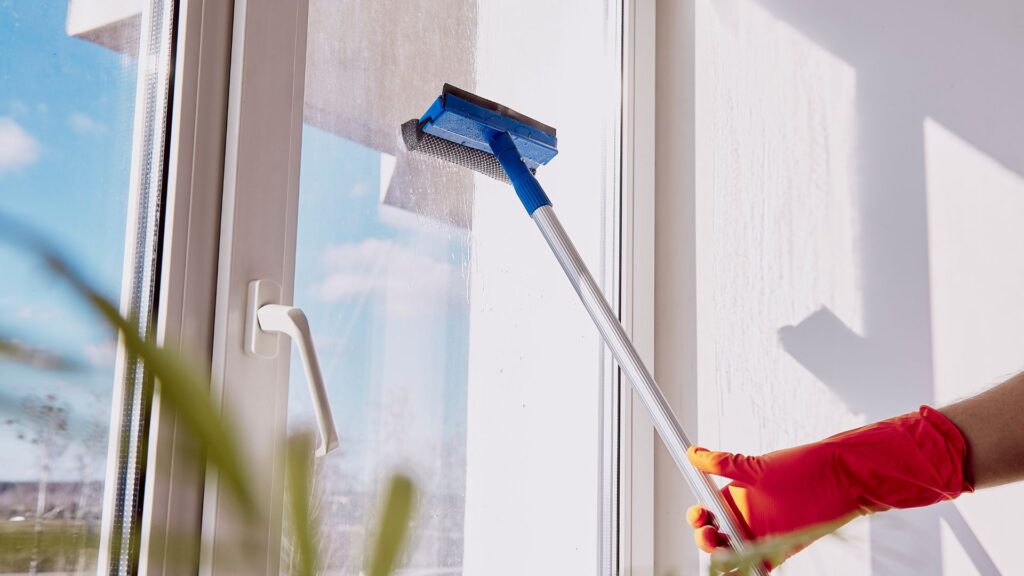
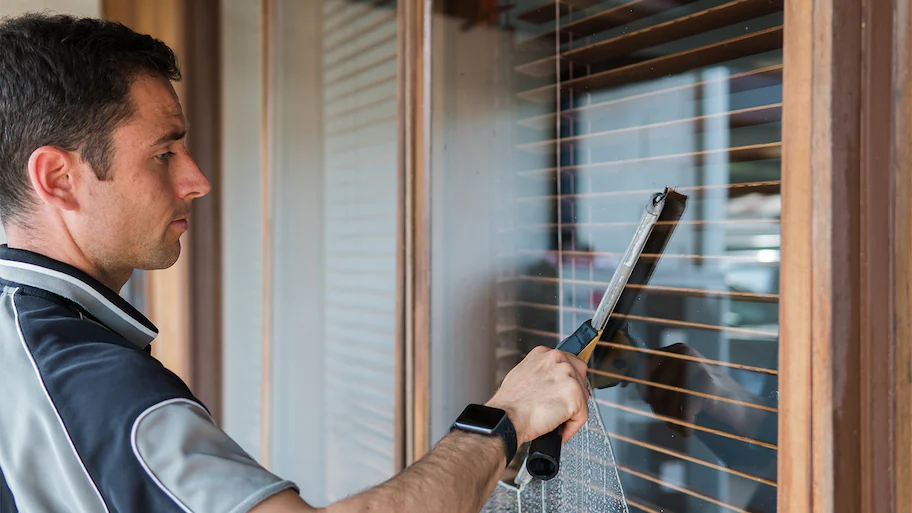
8. Use a Squeegee for Streak-Free Results:

After applying the cleaning solution, use a squeegee with an extension pole attachment to remove the solution and water from the window surface. Start at the top corner of the window and pull the squeegee horizontally across the glass in a single, continuous motion. Wipe the blade of the squeegee with a clean, lint-free cloth or towel after each pass to prevent streaks.

9. Dry and Polish the Windows:

Once you’ve squeegeed the entire window, use a dry microfiber cloth or lint-free towel to wipe away any remaining moisture and polish the glass to a streak-free shine. Alternatively, use crumpled newspaper or coffee filters for drying, as they absorb moisture and leave behind a lint-free finish.

10. Inspect and Touch Up as Needed:

After cleaning the exterior windows, inspect them from both inside and outside to ensure they are streak-free and sparkling. If you notice any streaks or spots, use a dry microfiber cloth or squeegee to touch up the affected areas until you achieve the desired results.

11. Perform Regular Maintenance:

To keep your exterior windows looking their best, establish a regular cleaning schedule and perform routine maintenance tasks as needed. Clean your windows at least twice a year, preferably in the spring and fall, to remove dirt, pollen, and other contaminants that can accumulate over time.

12. Consider Professional Assistance:

If you’re uncomfortable with heights or if the windows are difficult to reach safely, consider hiring a professional window cleaning service to handle the job. Professional window cleaners have the training, experience, and equipment to clean exterior windows safely and effectively, even in challenging situations.

Window Cleaning Service Southlake TX  Remember to prioritize safety at all times, use the right tools and equipment for the job, and take your time to ensure a thorough and streak-free finish. With proper technique and regular maintenance, your exterior windows will remain clean and clear for years to come.

Squeaky Clean Windows

2140 E Southlake Blvd L629, Southlake, TX 76092, United States

1-817-938-7654

What Is The Best Way To Clean Windowsills – DFW Window Cleaning Colleyville

Window Cleaning Service Colleyville TX is a task often overlooked but essential for maintaining a clean and well-kept home. Over time, windowsills can accumulate dust, dirt, and other debris, detracting from the overall appearance of your living space.

In this comprehensive guide, we’ll explore the best ways to clean windowsills, ensuring they remain tidy, and contributing to a fresh and inviting atmosphere.

1. Gather Your Cleaning Supplies: Before you begin, gather the necessary cleaning supplies. You’ll need a soft brush, a vacuum cleaner with a brush attachment, a mild cleaning solution, a microfiber cloth or sponge, a toothbrush, and a dry lint-free cloth.

2. Remove Loose Debris: Start by removing any loose debris from the windowsills. Use a soft brush or a vacuum cleaner with a brush attachment to gently sweep away dust, dirt, and cobwebs. Pay attention to corners and crevices where debris may accumulate.

3. Vacuum the Area: Use a vacuum cleaner with a brush attachment to further remove any remaining loose debris. This is an effective way to ensure that dust and particles are thoroughly removed from the windowsill and surrounding areas.

4. Mix a Mild Cleaning Solution: Prepare a mild cleaning solution by mixing warm water with a small amount of dish soap or a gentle all-purpose cleaner. Avoid using harsh chemicals that may damage the windowsill material.

5. Test on a Small Area: Before applying the cleaning solution to the entire windowsill, test it on a small, inconspicuous area to ensure compatibility with the material. This is especially important for painted or finished windowsills.

6. Apply the Cleaning Solution: Dip a microfiber cloth or sponge into the cleaning solution and gently wipe down the entire surface of the windowsill. Ensure that the cleaning solution reaches corners and edges where dirt may be more concentrated.

7. Use a Toothbrush for Detailing: For detailed cleaning, especially in grooves and corners, use a toothbrush. Dip the toothbrush into the cleaning solution and scrub areas that may require extra attention. The bristles of the toothbrush can reach into small crevices effectively.

8. Address Stubborn Stains: If you encounter stubborn stains on the windowsill, create a paste using baking soda and water. Apply the paste to the stained areas and let it sit for a few minutes before scrubbing with a toothbrush. This natural abrasive can help lift stains without damaging the surface.

9. Wipe Down with a Clean Cloth: After cleaning, use a clean, damp microfiber cloth to wipe down the windowsill, removing any residue from the cleaning solution. Ensure that the cloth is thoroughly wrung out to avoid excessive moisture.

10. Dry the Windowsill: Use a dry lint-free cloth to dry the windowsill completely. This step is crucial, especially for wooden windowsills, as excess moisture can lead to warping or damage. Make sure to reach into corners and edges to remove any remaining moisture.

11. Consider Material-Specific Cleaners: If your windowsills are made of specific materials like wood or metal, consider using cleaners specifically designed for those materials. These cleaners can provide optimal care and maintenance for the specific needs of the windowsill.

12. Clean Window Tracks: While cleaning the windowsill, take the opportunity to clean the window tracks. Use a vacuum cleaner with a narrow nozzle or a small brush to remove dirt and debris from the tracks. Wipe them down with a damp cloth to ensure thorough cleaning.

13. Maintain Regular Cleaning Routine: Incorporate regular windowsill cleaning into your household cleaning routine. This proactive approach prevents the buildup of dirt and makes each cleaning session more manageable.

14. Address Mold or Mildew: If you notice any signs of mold or mildew on the windowsill, address it promptly. Use a solution of white vinegar or hydrogen peroxide to eliminate mold or mildew, and ensure proper ventilation in the room to prevent recurrence.

15. Clean Exterior Windowsills: Don’t forget to clean the exterior windowsills if accessible. Use the same cleaning process, and consider using an extendable brush or pole for hard-to-reach areas.

16. Protect the Windowsill Finish: For painted or finished windowsills, consider applying a clear protective sealant after cleaning. This can help preserve the finish and protect the windowsill from future stains or damage.

17. Be Mindful of Window Treatments: If you have window treatments such as blinds or curtains, be mindful of them during the cleaning process. Protect them from cleaning solutions and moisture to prevent damage.

18. Clean Screens Separately: If your windows have screens, remove them and clean them separately. Use a soft brush or vacuum cleaner to remove dust and debris, and wash the screens with a mild soap and water solution.

19. Consult Manufacturer Guidelines: If your windowsills are part of a specific window brand or material, consult the manufacturer’s guidelines for cleaning and maintenance. Following these recommendations ensures that you care for your windowsill in a way that preserves its integrity.

20. Replace Damaged Windowsills: If you discover any significant damage or deterioration during the cleaning process, consider replacing the windowsills. Timely replacement ensures the structural integrity of the windows and prevents further issues.

21. Enjoy the Clean Windowsills: Once you’ve completed the cleaning process, take a moment to appreciate the clean and refreshed windowsills. Enjoy the improved aesthetics and the positive impact on your living space.

In conclusion, Window Cleaning Service Colleyville TX is a straightforward yet essential task for maintaining a clean and inviting home. By following these detailed steps and using the right cleaning supplies, you can keep your windowsills in top condition and enhance the overall cleanliness of your living space.

DFW Window Cleaning Colleyville

1808 Maplewood Trail, Colleyville, TX 76034, United States

1-817-813-8010

What Is The Best Way To Clean Windows On A Second Floor – Plano Window Cleaning & Glass Repair

Window Cleaning Service Plano TX add charm and character to our homes, allowing natural light to flood in and providing picturesque views of the surroundings.

However, when those windows are on the second floor, the task of cleaning them becomes a formidable challenge. This guide aims to unravel the mysteries of second-floor window cleaning, offering practical tips, expert advice, and a step-by-step process to ensure your windows sparkle.

Assessing the Situation

Before ascending to clean those windows, it’s crucial to assess the situation. Consider the height of the windows and the accessibility of the area. Safety should be a top priority. Equip yourself with the necessary gear, such as a sturdy ladder and safety harness, to avoid accidents.

Essential Tools and Equipment

To embark on your window-cleaning journey, gather essential tools such as a squeegee, a bucket, and microfiber cloths. Invest in high-quality cleaning solutions to ensure a streak-free shine. The right tools make a significant difference in the efficiency and outcome of your cleaning efforts.

Choosing the Right Weather

Timing is everything when it comes to window cleaning. Choose a day with mild weather, preferably overcast but not rainy. Cleaning on a sunny day may result in streaks due to the rapid drying of cleaning solutions.

Step-by-Step Cleaning Process

Break down the cleaning process into manageable steps. Start by dusting off loose dirt and debris, then move on to soaping and squeegeeing. Take your time and follow a systematic approach to achieve optimal results.

Homemade vs. Commercial Cleaners

While homemade solutions can be effective, commercial window cleaning products often offer a higher level of efficiency. Consider the trade-offs and choose the option that best suits your preferences and needs.

Safety Measures

Prioritize safety by wearing appropriate gear, including gloves and safety glasses. Ensure that your ladder is stable and positioned on a flat surface. Taking the necessary precautions is key to a successful and safe window-cleaning experience.

Dealing with Stubborn Stains

Identify common stains on windows, such as water spots or bird droppings, and address them with suitable cleaning solutions. Stubborn stains may require a bit of extra effort, but the results will be well worth it.

Reaching Difficult Spots

Cleaning second-floor windows often involves reaching challenging spots. Invest in extendable tools or window cleaning kits that allow you to reach heights without compromising safety or the quality of your work.

Regular Maintenance Tips

Maintaining clean windows is an ongoing process. Establish a regular cleaning routine to prevent dirt buildup and ensure your windows remain crystal clear throughout the year.

Eco-Friendly Practices

Consider eco-friendly cleaning practices by opting for environmentally conscious cleaning solutions. Vinegar, lemon juice, or baking soda can be excellent alternatives to chemical-laden cleaners, promoting a greener approach to window cleaning.

Benefits of Clean Windows

Beyond the obvious aesthetic benefits, clean windows contribute to a healthier living environment. Unobstructed sunlight enhances mood, and regularly cleaned windows can also improve the longevity of the glass.

Common Mistakes to Avoid

Avoid common cleaning mistakes that could damage your windows, such as using abrasive materials or neglecting proper drying techniques. By steering clear of these errors, you’ll maintain the integrity of your windows.

Expert Tips from Professional Cleaners

For those seeking the ultimate window-cleaning wisdom, consider insights from professional cleaners. Whether it’s the type of squeegee they swear by or the specific cleaning solutions they recommend, these experts can provide valuable guidance.

Conclusion:

In conclusion, achieving sparkling Window Cleaning Service Plano TX on the second floor is not an insurmountable task. With the right tools, a systematic approach, and a commitment to safety, you can enjoy the benefits of pristine windows without the need for professional help. Embrace the process, and let the natural light shine through.

Plano Window Cleaning & Glass Repair

1201 Legacy Dr #2114, Plano, TX 75023, United States

1-972-544-1373

Are There Any Window Cleaning Tricks For Rainy Weather – NRH Window Cleaning & Glass Repair

Window Cleaning Service North Richland Hills TX not only enhance the aesthetics of your home but also provide a clearer view of the outside world. However, the challenge arises when the weather turns rainy.

Fear not! We’ve compiled a comprehensive guide on window cleaning tricks specifically tailored for rainy weather. Let’s dive in and discover how to keep those windows crystal clear, even when the raindrops are falling.

Choosing the Right Tools and Materials

To embark on a successful window cleaning mission during rainy weather, having the right tools is crucial. Invest in a high-quality window cleaner, opt for microfiber cloths that absorb water efficiently, and consider adding a squeegee to your toolkit for streak-free results.

Preparation for Rainy Weather Cleaning

Before you start cleaning, check the weather forecast. Timing is key! Choose a period when rain is less likely to interfere. Additionally, ensure safety measures are in place, especially if you’re using a ladder for upper-level windows.

Cleaning Solutions for Rainy Days

Crafting a DIY vinegar solution or using commercial rain-resistant cleaners can be game-changers. These solutions not only cut through grime but also provide an added layer of protection against rain spots.

Techniques for Effective Rainy Weather Cleaning

Adopt a top-to-bottom approach to prevent water streaks. Wipe windows in a circular motion for optimal cleaning, and master various drying techniques to leave your windows spotless.

Dealing with Stubborn Stains

Hard water stains and stubborn grime can be challenging. Explore specific solutions for each, ensuring your windows are not only clean but also free from unsightly blemishes.

Special Considerations for Different Window Types

Different windows require different care. Learn how to handle double-pane windows and maintain the clarity of tinted windows during rainy weather.

Maintaining Windows After Rainy Weather Cleaning

Consistency is key! Establish a regular cleaning schedule and consider applying protective coatings to prolong the cleanliness of your windows.

Common Mistakes to Avoid

From abrasive materials to neglecting safety precautions, steer clear of common mistakes that could hinder your window cleaning success.

Benefits of Clean Windows in Rainy Weather

Enjoy improved visibility and enhanced natural light with clean windows, even when it’s raining outside.

Tips for Commercial Window Cleaning

For businesses, hiring professionals or establishing a regular maintenance routine can ensure your storefront or office windows remain pristine.

DIY vs. Professional Cleaning

Consider the cost and time investment of DIY cleaning versus hiring professionals for a thorough and efficient job.

Environmental Impact of Window Cleaning

Make eco-friendly choices with cleaning solutions and ensure proper disposal practices to minimize the environmental impact.

Customer Testimonials

Discover success stories from individuals who have mastered the art of rainy weather window cleaning using these tricks.

Conclusion:

In conclusion, don’t let rainy weather dampen your Window Cleaning Service North Richland Hills TX. Armed with the right tools, techniques, and knowledge, you can maintain crystal-clear windows that stand up to the challenges of rain. Remember to follow these tricks consistently for optimal results.

NRH Window Cleaning & Glass Repair

7510 Davis Blvd # B, North Richland Hills, TX 76182, United States

1-817-601-6082

What Tools Do I Need For Professional Window Cleaning – Southlake Window Cleaning & Glass Repair

Achieving professional-quality Southlake Window Cleaning Service requires the right tools and techniques.

Whether you’re a professional window cleaner or a homeowner aiming for spotless and streak-free windows, having the proper equipment is essential. Let’s explore the key tools needed for professional window cleaning and how each contributes to achieving a polished finish.

1. Squeegee: A high-quality squeegee is a fundamental tool for professional window cleaning. Choose a squeegee with a durable rubber blade that provides consistent pressure across the glass surface. Squeegees come in various sizes, and having a range allows you to tackle different window sizes effectively. The blade should be sharp and free from nicks to ensure a streak-free finish.

2. Window Cleaning Solution: Invest in a professional-grade window cleaning solution or formulate your own. Commercial options often contain detergents that break down dirt and grime effectively. For a DIY solution, mix a small amount of mild dish soap with water or use a vinegar and water mixture. A quality cleaning solution is crucial for achieving clear and sparkling windows.

3. Bucket: A sturdy bucket is essential for holding your window cleaning solution. Look for a bucket with a wide opening to accommodate your squeegee and applicator. Some window cleaning buckets come with a built-in sieve to remove excess water from the squeegee, preventing dripping during use.

4. Applicator or Scrubber: An applicator or scrubber is used to apply the cleaning solution to the window surface and agitate dirt and grime. Choose an applicator with an absorbent and durable cover, such as microfiber or a synthetic sponge. The applicator should be wide enough to cover the window efficiently.

5. Extension Pole: An extension pole is crucial for reaching high windows without the need for a ladder. Choose a telescopic pole that can be adjusted to different lengths. Many professional window cleaners use extension poles with threaded ends to attach tools like squeegees, scrubbers, or even a water-fed pole system for external window cleaning.

6. Lint-Free Cloths or Towels: Lint-free cloths or towels are essential for wiping edges, frames, and corners after using the squeegee. Microfiber cloths are a popular choice due to their ability to trap and lift dirt without leaving lint behind. Having a supply of clean, dry cloths ensures a streak-free finish.

7. Razor Blade or Scraper: A razor blade or scraper is useful for removing stubborn substances like paint, adhesive, or dried-on debris from the window surface. Use caution when using a razor blade to avoid scratching the glass. It’s recommended for professional use or for homeowners with experience in its proper application.

8. Water-Fed Pole System: For external window cleaning, especially on multi-story buildings, a water-fed pole system can be a game-changer. This system includes a telescopic pole with water jets and a brush at the end. Purified water is pumped through the pole, allowing you to scrub and rinse windows from the ground. It eliminates the need for ladders and promotes safety.

9. Window Cleaning Belt or Holster: A window cleaning belt or holster provides a convenient way to carry and organize your tools while working. It typically includes compartments for your squeegee, scrubber, and additional tools. This allows you to have easy access to your equipment without constantly returning to your bucket.

10. T-Bar: The T-bar is a tool that holds the scrubber or applicator cover. It has a T-shaped handle that provides a comfortable grip, allowing you to apply pressure evenly while cleaning windows. T-bars come in various sizes to match different window widths.

11. Bucket-on-a-Belt: A bucket-on-a-belt is a compact and portable solution for carrying a small amount of cleaning solution while working. It attaches to your belt, providing quick access to the solution for re-wetting your scrubber or applicator as needed.

12. Window Cleaning Belt Bucket: Some window cleaners prefer a belt bucket that attaches to their waist, providing a hands-free option for carrying cleaning solution. This allows for increased mobility and efficiency while working on multiple windows.

13. Protective Gear: Depending on the nature of the job, consider wearing protective gear such as gloves and safety glasses. Gloves protect your hands from the cleaning solution, and safety glasses prevent any splashes or drips from getting into your eyes.

14. Ladder: While not always necessary, a sturdy ladder is essential for reaching windows beyond the capabilities of an extension pole. Ensure that the ladder is on stable ground, and follow safety guidelines when using it. For higher or hard-to-reach windows, consider professional window cleaning services or a water-fed pole system.

15. Window Cleaning Soap: Specialized window cleaning soap can be added to your cleaning solution to enhance its cleaning power. These soaps are designed to break down dirt and grime effectively, leaving windows with a streak-free shine.

16. Professional-Grade Sponges: Professional-grade sponges are designed for efficient window cleaning. They have a durable and absorbent construction, making them suitable for applying cleaning solution and agitating dirt on window surfaces.

17. Angle Adapter: An angle adapter for your squeegee allows you to adjust the angle of the squeegee handle, making it easier to reach corners and edges. This attachment enhances your ability to clean the entire window thoroughly.

18. Window Cleaning Solution Reservoir: Some professional window cleaners use a solution reservoir that attaches to their belt or tool belt. This reservoir provides a continuous supply of cleaning solution, eliminating the need to dip into a bucket frequently.

19. Professional Window Cleaning Solution Concentrate: Consider using a professional window cleaning solution concentrate for optimal results. These concentrates are formulated for commercial use, providing powerful cleaning action without leaving residue or streaks.

20. Pressure Washer (Optional): For external window cleaning, especially on large surfaces or buildings, a pressure washer can be used to remove dirt and grime quickly. Use caution to avoid excessive pressure, which can damage windows or force water into the building.

In conclusion, professional Southlake Window Cleaning Service requires a combination of quality tools and the right techniques. Whether you’re cleaning windows in a residential or commercial setting, having the appropriate equipment ensures efficiency and delivers the polished results associated with professional window cleaning. Invest in high-quality tools, prioritize safety, and follow proper cleaning procedures for a clear and streak-free finish.

Southlake Window Cleaning & Glass Repair

1052 Summerplace Ln, Southlake, TX 76092, United States

1-817-839-4773

The Role of Professional Window Cleaning in Home Sales – DFW Window Cleaning Coppell

As a homeowner who recently embarked on the journey of selling my house, I quickly discovered that every detail, no matter how seemingly insignificant, plays a crucial role in attracting potential buyers. It was during this process that I truly comprehended the value of professional window cleaning in the realm of home sales.

Based from Window Cleaning Coppell TX, I’ll share my personal experiences and insights into the pivotal role that clean windows play in making a lasting impression on potential buyers.

The Home Selling Odyssey

Selling a home can be an emotionally charged endeavor. It’s a process filled with excitement, anticipation, and a dash of anxiety. As I prepared my home for the market, I meticulously attended to every aspect of presentation, from decluttering to staging. However, it wasn’t until I turned my attention to the windows that I realized the transformative power they held.

The First Glimpse

Potential buyers form their first impression of a home before they even step inside. The exterior and curb appeal set the tone for the entire viewing experience. Clean, gleaming windows are like crystal-clear invitations, beckoning visitors to explore further. Dirty, neglected windows, on the other hand, can be a deterrent, signaling a lack of care and maintenance.

The Impact of Clean Windows

As I contemplated whether to invest in professional window cleaning before listing my home, I decided to explore the potential benefits. It became evident that clean windows offer a myriad of advantages when it comes to home sales:

1. Enhanced Curb Appeal

Clean windows significantly contribute to a home’s curb appeal. They reflect sunlight, making the entire exterior appear brighter and more inviting. Potential buyers are more likely to be drawn in by a well-maintained, aesthetically pleasing property.

2. Maximizing Natural Light

Clean windows allow natural light to flood the interior spaces, creating an open and airy atmosphere. Sunlit rooms appear more spacious, making it easier for buyers to envision their own furnishings and decor in the space.

3. Unobstructed Views

Clear windows provide unobstructed views of the surrounding landscape. Whether it’s a well-landscaped garden, a serene backyard, or a picturesque street, buyers want to see what lies beyond the glass.

4. Highlighting Interior Features

Clean windows frame the interior like artwork, drawing attention to architectural features, design elements, and the overall cleanliness of the home. They help buyers focus on the positives rather than distracting them with smudges or streaks.

5. Reflecting Pride of Ownership

Well-maintained windows signal to potential buyers that the current homeowners have taken excellent care of the property. This instills confidence and trust in the overall condition of the home.

My Professional Window Cleaning Experience

To fully harness the potential benefits of clean windows in the home sales process, I decided to invest in professional window cleaning. Here’s how the experience unfolded:

1. Finding the Right Professionals

I started by researching and contacting local window cleaning companies. It was essential to choose professionals with a reputation for quality service and attention to detail. I also sought recommendations from friends and real estate agents.

2. Comprehensive Window Cleaning

The professional window cleaners conducted a thorough and comprehensive cleaning of all the windows in my home. This included both the interior and exterior surfaces, frames, and sills. They also paid attention to any stubborn spots or mineral deposits.

3. Safety and Efficiency

Professional window cleaners are equipped with the necessary tools and safety gear to clean windows effectively, especially in hard-to-reach areas or multistory homes. Their efficiency and expertise ensured that the process was completed promptly.

4. Streak-Free Results

The most satisfying part of the experience was the streak-free results. The professional window cleaners used the right techniques and equipment, such as squeegees and high-quality cleaning solutions, to leave the windows sparkling clear.

5. Lasting Impression

After the professional window cleaning, my home underwent a remarkable transformation. The clarity and brightness of the windows created an inviting ambiance that impressed both me and potential buyers.

Preparing for Showings

With clean windows enhancing the overall appeal of my home, I also learned the importance of strategic planning for showings:

1. Timing Matters

Scheduling showings during daylight hours allows the natural light to showcase your home’s features. Clean windows maximize the impact of this light, making your home look its best.

2. Highlighting Views

For homes with scenic views, consider scheduling showings during moments when the view is most captivating, such as during a sunrise or sunset.

3. Creating a Welcoming Atmosphere

During showings, open curtains and blinds to let in as much natural light as possible. Ensure that windowsills and frames are clean and free from clutter.

4. Regular Maintenance

Maintaining the cleanliness of your windows throughout the selling process is essential. Dust, pollen, and environmental debris can accumulate quickly, detracting from the overall presentation.

The Buyer’s Perspective

As I observed potential buyers exploring my home, I gained valuable insights into the impact of clean windows from their perspective:

1. Positive Reactions

Buyers consistently reacted positively to the brightness and cleanliness of the interior spaces. They often commented on the clarity of the views and the inviting atmosphere.

2. Emotional Connection

Clean windows seemed to foster an emotional connection between buyers and the property. They imagined themselves enjoying the views and the natural light in their future home.

3. Confidence in the Home

The cleanliness and care evident in the windows extended a sense of confidence to potential buyers. It reassured them that the home had been well-maintained.

Conclusion

Overall, as per Window Cleaning Coppell TX and in the journey of selling my home, I came to understand that clean windows are not just an aesthetic enhancement but a critical factor in making a lasting impression on potential buyers. They contribute to enhanced curb appeal, natural light, unobstructed views, and a sense of pride of ownership. To fully realize the benefits of clean windows, investing in professional window cleaning is a wise choice.

Clean windows set the stage for a positive buyer experience, fostering emotional connections and instilling confidence in the home. They invite buyers to envision a bright and sunny future within the walls of your property. So, whether you’re preparing to sell your home or simply seeking to enhance its overall appeal, never underestimate the transformative power of clear panes in the world of real estate.

DFW Window Cleaning Coppell

842 Dalmalley Ln, Coppell, TX 75019, United States

469-809-1532

How Paint and Adhesive Residue from Windows? – DFW Window Cleaning Mckinney

As I looked at the old windows in my new home, I couldn’t help but notice the remnants of past DIY projects. Paint splatters and adhesive residue marred the once-clear glass, obstructing the view of the lush green garden outside. Determined to restore the windows to their former glory, I embarked on a journey to learn the art of removing paint and adhesive residue from windows.

Based from Window Cleaning Mckinney TX experts, I’ll share the lessons I’ve learned and the techniques I’ve mastered to bring clarity back to my windows.

The Challenge of Paint and Adhesive Residue

Paint splatters and adhesive residue are common issues that can plague windows. They can occur during home improvement projects, renovations, or even from old stickers or tape. Not only do they detract from the aesthetics of your windows, but they can also obstruct natural light and make your living space feel less inviting.

1. Paint Residue: A Stubborn Foe

Paint residue on windows can be particularly challenging to remove. It often dries and hardens onto the glass, making it resistant to standard cleaning methods. The longer it remains, the more tenacious it becomes, requiring extra effort to eradicate.

2. Sticky Adhesive Remnants

Adhesive residue is another common culprit, often left behind by stickers, tape, or labels. This sticky mess can attract dust and dirt, making your windows appear unsightly and difficult to clean.

My Journey to Window Clarity

My journey to restore my windows to their crystal-clear state began with research and experimentation. I was determined to find effective methods for removing both paint and adhesive residue without damaging the glass or frame. Here are the steps I took and the lessons I learned along the way.

1. Gather Your Tools and Supplies

Before tackling the task, it’s essential to gather the right tools and supplies. You’ll need:

  • Razor blade scraper: This is an indispensable tool for removing stubborn paint and adhesive residue.
  • Plastic scraper or putty knife: A plastic scraper is less likely to scratch the glass than a metal one.
  • White vinegar: Vinegar is a natural and effective cleaning agent.
  • Warm, soapy water: A mild dish soap mixed with warm water is an excellent cleaning solution.
  • Clean, lint-free cloths or paper towels: These will help you wipe away residue and cleaning solutions.
  • Rubbing alcohol: Useful for breaking down adhesive residues.
  • Bucket: To mix your cleaning solutions and hold your tools.

2. Safety First

Safety should always be a priority when working with windows, especially when using sharp tools like razor blade scrapers. Here are some safety precautions to keep in mind:

  • Protective gear: Wear gloves and safety goggles to protect your hands and eyes.
  • Proper ventilation: Ensure that the area is well-ventilated to prevent inhaling fumes from cleaning agents.
  • Tool handling: Be cautious when using sharp tools, and always cut away from your body to avoid accidents.

3. Removing Paint Residue

Paint residue on windows can be particularly stubborn, but with patience and the right technique, it can be conquered.

Steps for Removing Paint Residue:

  1. Softening the paint: Begin by softening the paint residue. Soak a clean cloth or paper towel in white vinegar and place it over the painted area. Let it sit for about 15-20 minutes to loosen the paint.
  2. Scraping the paint: After the paint has softened, use a plastic scraper or putty knife to gently scrape away the softened paint. Be careful not to scratch the glass.
  3. Rinse and clean: Rinse the window with warm, soapy water to remove any remaining paint residue and vinegar. Wipe it clean with a lint-free cloth or paper towel.
  4. Repeat if necessary: Depending on the thickness of the paint residue, you may need to repeat the process to completely remove it.

4. Dealing with Adhesive Residue

Adhesive residue can be equally frustrating to remove, but the right approach can make it easier.

Steps for Removing Adhesive Residue:

  1. Testing an inconspicuous area: Before applying any cleaning agents, test a small, inconspicuous area of the window to ensure that it won’t damage the glass or frame.
  2. Using rubbing alcohol: Apply a small amount of rubbing alcohol to a clean cloth or paper towel.
  3. Gently rubbing the residue: Gently rub the adhesive residue with the cloth soaked in rubbing alcohol. Use light pressure to avoid scratching the glass.
  4. Wipe clean: Once the adhesive has loosened, wipe the area clean with warm, soapy water.
  5. Rinse and dry: Rinse the window thoroughly with clean water and dry it with a lint-free cloth or paper towel.

5. Prevention Is Key

Preventing paint and adhesive residue in the first place is always the best approach. Here are some preventive measures you can take:

  • Use masking tape and drop cloths: When painting near windows, use masking tape and drop cloths to protect the glass from splatters and drips.
  • Remove stickers and labels carefully: If you need to place stickers on windows temporarily, use a gentle adhesive and remove them promptly to avoid residue buildup.
  • Choose removable adhesive products: When using adhesives, choose products that are designed to be easily removable without leaving behind residue.

The Rewards of Window Clarity

As I completed my journey to remove paint and adhesive residue from my windows, I was rewarded with a newfound appreciation for the clarity and brightness they brought to my living space. The view of my garden was no longer obstructed by unsightly blemishes, and natural light streamed in unhindered.

Not only did I regain a clear view, but I also learned valuable skills and techniques for maintaining the cleanliness and beauty of my windows. The satisfaction of looking through crystal-clear glass, unmarred by paint splatters and sticky residues, was worth every effort.

Conclusion: A Clear Path to Window Perfection

Removing paint and adhesive residue from windows can be a challenging task, but with the right tools, techniques, and a bit of patience, it’s entirely achievable. The journey to window clarity not only restores the aesthetic beauty of your home but also enhances the quality of your living environment by allowing more natural light to fill your space.

So, as stated in Window Cleaning Mckinney TX, the next time you find yourself staring at windows marred by paint splatters or adhesive residue, don’t despair. Embrace the opportunity to embark on a journey of restoration, and you’ll soon enjoy the rewards of crystal-clear views and a brighter, more inviting living space.

DFW Window Cleaning Mckinney

10701 Smithville Pl, McKinney, TX 75071, United States

972-433-5793

Window Screens: Cleaning and Maintenance – DFW Window Cleaning Colleyville

As a homeowner who takes great pride in the aesthetics and cleanliness of my living space, I’ve come to appreciate the often-overlooked heroes of home maintenance: window screens. These unassuming mesh barriers not only keep pests at bay but also allow fresh air to flow freely into my home while keeping dust and debris outside. Over the years, I’ve learned that regular cleaning and maintenance of window screens are essential not only for functional efficiency but also for preserving the overall beauty of my home.

By following Window Cleaning Colleyville TX, I’ll share my experiences and insights into window screen cleaning and maintenance, ensuring that you, too, can enjoy the benefits of a clear view and a well-maintained home.

The Role of Window Screens

Before delving into the techniques and tips for cleaning and maintaining window screens, it’s important to understand the significance of these humble components in our homes:

  1. Pest Control: Window screens serve as a protective barrier against unwanted intruders, including insects and pests. They allow us to enjoy fresh air and natural ventilation without inviting critters indoors.
  2. Dust and Debris Prevention: Window screens act as a filter, capturing dust, pollen, and debris before they can enter our homes. This not only helps maintain indoor air quality but also reduces the need for frequent cleaning of interior surfaces.
  3. Ventilation: Screens enable us to open windows and doors, allowing cross-ventilation that cools our homes naturally. This can reduce the need for energy-intensive air conditioning.

Cleaning and Maintenance: The Key to Functional and Aesthetic Screens

Clean and well-maintained window screens contribute significantly to the overall appeal and functionality of your home. Here’s how to keep them in top shape:

1. Regular Cleaning Schedule

Establishing a routine for cleaning your window screens is essential to prevent the buildup of dust, dirt, and grime. Depending on your environment, you may want to clean them at least once a season, if not more frequently.

2. Gather the Necessary Supplies

Before you begin, gather the following supplies:

  • Soft bristle brush or handheld vacuum cleaner with brush attachment
  • A bucket filled with warm, soapy water (mild dish soap works well)
  • Soft microfiber cloths or a sponge
  • Garden hose with a spray nozzle attachment
  • A towel or drop cloth to protect the surrounding area
  • A soft brush or cloth for scrubbing stubborn spots
  • Optional: A window screen cleaning solution or a mixture of white vinegar and water

3. Remove Screens Carefully

Start by removing the window screens from their frames. Lay them flat on a clean, flat surface, preferably outdoors, to avoid making a mess inside your home.

4. Brush Away Loose Debris

Before wetting the screens, use a soft bristle brush or a handheld vacuum cleaner with a brush attachment to remove loose dirt, dust, and cobwebs. Pay special attention to the corners and edges where debris tends to accumulate.

5. Wash with Soapy Water

Fill a bucket with warm, soapy water (using a mild dish soap) and dip a soft microfiber cloth or sponge into the soapy solution. Gently scrub both sides of the window screens, working from top to bottom. Use a soft brush or cloth for any stubborn spots or stains.

6. Rinse Thoroughly

Once you’ve scrubbed the screens, rinse them thoroughly using a garden hose with a spray nozzle attachment. Make sure to remove all soap residue. Avoid using high-pressure settings on the hose, as this can damage the screen material.

7. Use a Screen Cleaning Solution (Optional)

For an extra level of cleanliness and shine, consider using a specialized window screen cleaning solution or a mixture of white vinegar and water. Spray this solution lightly on both sides of the screens and then rinse thoroughly with water.

8. Dry Screens Completely

After rinsing, gently shake the screens to remove excess water and allow them to air dry completely in a shaded area. Avoid exposing wet screens to direct sunlight, as this can cause the screens to warp or become discolored.

9. Inspect for Damage

While your screens are drying, take the opportunity to inspect them for any signs of damage, such as tears, holes, or bent frames. Repair or replace damaged screens as needed to maintain their effectiveness.

10. Reinstall Screens Carefully

Once your screens are completely dry and any necessary repairs have been made, carefully reinstall them in their respective window or door frames. Ensure that they fit snugly and securely.

Additional Tips for Window Screen Maintenance

Here are some additional tips to enhance the longevity and effectiveness of your window screens:

  1. Trim Nearby Vegetation: If you have shrubs or trees near your windows, trim them regularly to prevent branches and leaves from scratching or damaging the screens.
  2. Inspect for Pests: Periodically check your screens for signs of insect or pest damage, such as holes or tears. Promptly repair any damage to maintain their pest control effectiveness.
  3. Use Caution with Cleaning Solutions: Avoid using abrasive cleaners or harsh chemicals on window screens, as they can damage the screen material or coating. Stick to mild, soapy water or gentle cleaning solutions.
  4. Consider Screen Repair Kits: Screen repair kits are readily available and can be a cost-effective way to mend small tears or holes in your screens.
  5. Replace Worn Screens: Over time, screens may become worn or discolored. If cleaning and maintenance no longer restore their appearance or functionality, consider replacing them.

Conclusion: A Clear View and a Beautiful Home

Overall, as per Window Cleaning Colleyville TX and in my pursuit of a beautiful and well-maintained home, I’ve come to appreciate the importance of clean and functional window screens. These unassuming components play a vital role in pest control, dust prevention, and natural ventilation. By following a regular cleaning and maintenance routine, you can ensure that your window screens not only perform their intended functions but also enhance the overall aesthetic appeal of your home.

So, take the time to care for your window screens, and you’ll enjoy a clear view of the outside world while maintaining a welcoming and pristine living space.

DFW Window Cleaning Colleyville

1808 Maplewood Trail, Colleyville, TX 76034, United States

817-813-8010

Professional vs. DIY Window Cleaning: Which is Worth Your Investment? – Plano Window Cleaning & Glass Repair

As someone who takes immense pride in the appearance of my living space, the question of whether to opt for professional window cleaning services or embark on a DIY cleaning journey has been on my mind. The allure of gleaming windows and the desire to find the most effective approach led me to delve into a thorough comparison of both options.

By following Plano Window Cleaning, I’ll share my insights and experiences as I navigated the decision between professional and DIY window cleaning, shedding light on the factors that influenced my choice.

1. The Allure of Professional Expertise

Professional window cleaning services come with a promise of expertise and precision. These specialists are armed with tools, techniques, and knowledge that guarantee exceptional results. My desire for spotless, streak-free windows led me to consider the benefits of letting professionals handle the task, offering a level of clarity that’s challenging to attain through DIY methods.

2. The Temptation of the DIY Approach

At the same time, I was drawn to the idea of rolling up my sleeves and engaging in a DIY window cleaning adventure. There’s a certain sense of accomplishment in personally tending to one’s living space, and the cost-effectiveness of using household cleaning solutions was certainly appealing.

3. Balancing Time and Effort

As I assessed both options, the investment of time and effort emerged as a pivotal factor. While the allure of DIY was strong, my busy schedule often left me with limited time for extensive cleaning. The convenience of professionals, who could deliver efficient and effective results, began to tip the scales in their favor.

4. The Safety Equation

Considering the safety aspect was paramount, especially for windows at greater heights. The idea of scaling ladders or balancing on precarious surfaces didn’t align with my comfort level. Professionals, trained to navigate such challenges safely, offered a level of reassurance that was hard to ignore.

5. Results: From Satisfactory to Flawless

The quality of results was a critical consideration. I acknowledged that while my DIY efforts could yield satisfactory results, replicating the flawless clarity achieved by professionals might prove difficult. Their specialized tools and techniques seemed to hold the promise of streak-free, perfectly clean windows that could elevate the aesthetics of my home.

6. Crunching the Numbers

Cost, of course, played a role in my decision-making. Professional services come with a price tag, one that varies based on factors like window count and location. On the other hand, DIY cleaning primarily involves using readily available solutions and tools. However, it’s important to consider the value of my time and whether certain cleaning tasks would require investing in specialized equipment.

7. Navigating Special Cleaning Scenarios

Certain situations, such as tackling hard water stains or salt buildup on coastal windows, demanded a level of expertise beyond my DIY capabilities. Professionals possessed the know-how and tools to manage these scenarios effectively, ensuring my windows received comprehensive care.

8. A Green Touch

Environmental consciousness was a consideration for me. I appreciated the fact that both professional and DIY approaches could align with eco-friendly values. Many professionals were adopting non-toxic cleaning solutions, and DIY enthusiasts could easily opt for natural, earth-friendly cleaning agents.

9. Personalizing the Approach

Ultimately, the choice hinged on tailoring my decision to my specific needs. If I sought quick refreshment, a DIY approach might suffice. However, for the promise of impeccable results or when facing challenging cleaning situations, professionals seemed like the worthier investment.

10. A Matter of Balance

In the end, my decision to opt for professional or DIY window cleaning was about finding a balance. While professionals offered unmatched precision and expertise, the DIY path allowed for a more hands-on, budget-conscious experience. Regardless of my choice, what remained most important was the satisfaction I felt in maintaining windows that radiated cleanliness and added to the charm of my living space.

Conclusion: The Right Fit

Based from Plano Window Cleaning, choosing between professional and DIY window cleaning was a journey of weighing priorities and aligning them with available resources. The appeal of pristine windows was strong, and both options had their merits. It’s a decision that’s deeply personal, reflecting individual preferences and the commitment to creating a space that resonates with our sense of aesthetics and care.

Plano Window Cleaning & Glass Repair

1201 Legacy Dr #2114, Plano, TX 75023, United States

972-544-1373

Time-Saving Tips: Efficient Window Cleaning for Busy Individuals – NRH Window Cleaning & Glass Repair

Here’s my personal experiences and insights on efficient window cleaning for busy individuals. Being someone with a hectic schedule, I’ve learned a few valuable tricks to maintain sparkling windows without spending too much time.

Here’s how I’ve managed to make the most of my window cleaning routine in reference to North Richland Hills Window Cleaning:

1. Gather Your Supplies Ahead of Time To streamline my window cleaning process, I make sure to gather all my cleaning supplies before I begin. Having my cleaning solution, squeegee, microfiber cloths, and other tools ready prevents unnecessary trips back and forth, saving me precious time.

2. Timing Is Everything Choosing the right time to clean windows is essential. I usually opt for cloudy days or early mornings when the sun isn’t shining directly on the glass. This prevents streaks caused by cleaning solutions drying too quickly in direct sunlight.

3. Regular Maintenance Is Key I’ve found that frequent, small efforts go a long way. By dedicating a few minutes each week to dusting frames and wiping down the glass with a microfiber cloth, I prevent dirt buildup. This makes my periodic cleaning sessions much more efficient.

4. Swift Dusting Before Cleaning Before I start with the cleaning solution, I give my windows a quick dusting using a feather duster or dry microfiber cloth. Removing loose dirt and dust upfront significantly reduces the time and effort needed for a thorough clean.

5. DIY Cleaning Solution Preparing my own window cleaning solution has been a game-changer. I mix equal parts distilled white vinegar and water, adding a few drops of dish soap for tougher jobs. This not only saves time but also ensures I have an effective solution at hand whenever I need it.

6. Focus on High-Priority Windows Not all windows need immediate attention every time I clean. Instead of tackling every window in one go, I prioritize the ones that are visibly dirty or located in high-traffic areas. This targeted approach saves me both time and effort.

7. Harness the Power of the Squeegee Using a squeegee has been a real time-saver for me. It efficiently removes cleaning solution and water from the glass, leaving behind streak-free surfaces. Investing in a quality squeegee with a replaceable rubber blade is well worth it.

8. Efficient Application of Cleaning Solution To avoid overusing the cleaning solution, I apply it sparingly. Just a few sprays are usually enough. This prevents excess moisture from accumulating and reduces the time I spend wiping it off.

9. Scrubber with Microfiber Sleeve Combo I’ve found that using a scrubber with a microfiber sleeve is an efficient way to apply the cleaning solution and loosen dirt. The sleeve doubles as a scrubber and saves me from having to do separate steps.

10. Clean from Top to Bottom Starting from the top and working my way down ensures that any drips or streaks from cleaning solution won’t ruin areas I’ve already cleaned. This method helps me avoid redoing any sections.

11. Strategic Wiping Technique Wiping the glass with a microfiber cloth follows the path of the squeegee. This method effectively catches any remaining moisture and leaves a streak-free finish. I always save wiping the edges and corners for last.

12. The Newspaper Trick for Added Shine One nifty trick I’ve adopted is using crumpled newspaper to buff the glass after cleaning. It’s surprising how well this technique works to absorb excess moisture and leave a streak-free shine in less time.

13. Break It Down or Delegate When my schedule gets exceptionally busy, I either break down the task into smaller parts, tackling one or two windows per day, or delegate the task to a family member. This way, I maintain clean windows without overwhelming myself.

14. Routine Maintenance of Tools Properly maintaining my cleaning tools is a time-saver in the long run. I clean my squeegee and scrubber after each use, replace worn rubber blades promptly, and wash microfiber cloths regularly to keep them effective.

15. Multitask When Possible While waiting for the cleaning solution to set or the squeegee to dry, I often multitask by attending to other nearby tasks. This way, I make the most of my time during the cleaning process.

16. Set a Timer for a Short Cleaning Burst Setting a timer for a short cleaning session injects an element of urgency and focus. I’m always amazed by how much I can accomplish in a concentrated period of time.

17. Establish a Consistent Routine Creating a consistent window cleaning routine that fits my schedule is vital. Even if it’s just dedicating a brief period every week, the consistency pays off in keeping my windows clean without the need for marathon cleaning sessions.

18. Accept a “Good Enough” Approach Lastly, I’ve learned to embrace imperfections. Windows don’t need to be spotless at all times. A quick and efficient cleaning that maintains a reasonable level of clarity is often sufficient for me.

In summary, according to North Richland Hills Window Cleaning, by incorporating these time-saving strategies into my window cleaning routine, I’ve managed to keep my windows looking great without compromising my busy schedule. It’s all about finding a balance and making the most of the time available while still achieving the desired results.

NRH Window Cleaning & Glass Repair

7510 Davis Blvd # B, North Richland Hills, TX 76182, United States

817-601-6082

Page 1 of 2

Powered by WordPress & Theme by Anders Norén