Texas Business Listing Directories

Local Businesses Blog in Texas

Enhancing Functionality and Style: A Guide to Kitchen Drawer Fronts

bespoke handmade kitchens in UK

Bryan Turner Kitchens

The kitchen is the heart of the home, and its design plays a crucial role in both functionality and aesthetics. One often-overlooked aspect of kitchen design is the drawer fronts, which not only contribute to the overall look of cabinetry but also play a significant role in enhancing storage efficiency and organization. In this blog post, we’ll explore the importance of kitchen drawer fronts, different types available, and tips for choosing the right ones to elevate your kitchen experience.

Importance of Kitchen Drawer Fronts
Kitchen drawer fronts serve several essential purposes in a kitchen:

Aesthetic Appeal: Drawer fronts contribute significantly to the overall aesthetic of your kitchen. They can complement the style of your cabinetry, whether it’s traditional, modern, or transitional, and add visual interest to the space.

Storage Organization: Drawer fronts help keep your kitchen organized by concealing the contents of drawers. They create a cohesive look and prevent clutter from being visible, contributing to a clean and tidy kitchen environment.

Functional Access: The design of drawer fronts can affect how easily you can access items stored inside. Well-designed drawer fronts with ergonomic handles or integrated pull-outs enhance functionality and make everyday tasks more efficient.

Types of Kitchen Drawer Fronts
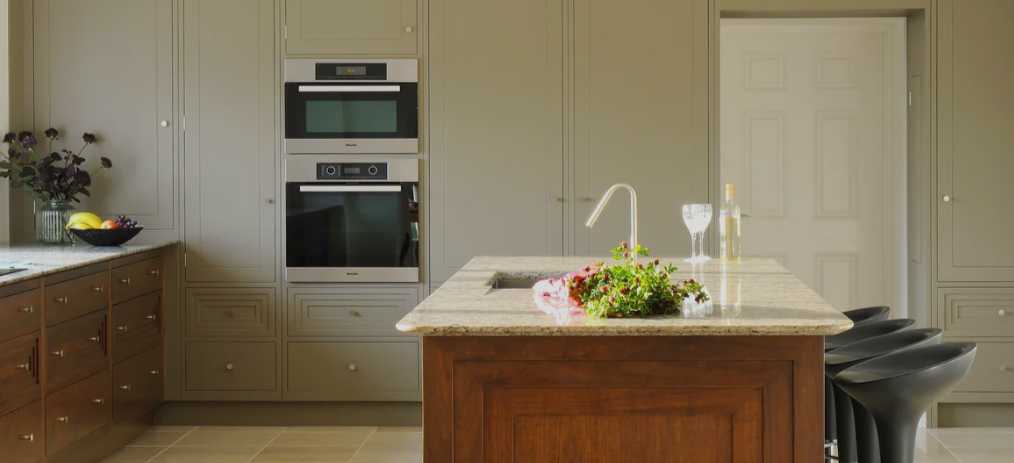
Flat Panel: Flat panel drawer fronts have a simple, flat surface without any raised or recessed details. They offer a clean and minimalist look, making them suitable for modern and contemporary kitchens.

Raised Panel: Raised panel drawer fronts feature a center panel that is raised above the surrounding frame. This style adds depth and texture to cabinetry, making it a popular choice for traditional and classic kitchen designs.

Slab: Slab drawer fronts are characterized by a single, solid piece of material with no embellishments or panels. They have a sleek and streamlined appearance, ideal for achieving a modern and minimalist aesthetic.

Shaker: Shaker drawer fronts feature a five-piece construction with a recessed center panel and clean lines. They offer a versatile look that suits various kitchen styles, from farmhouse to transitional.

Tips for Choosing Kitchen Drawer Fronts
Consider the Kitchen Style: Choose drawer fronts that complement the overall style of your kitchen. For example, opt for raised panel fronts for a traditional look or slab fronts for a contemporary vibe.

Material and Finish: Select high-quality materials and finishes that are durable and easy to maintain. Popular choices include wood, laminate, acrylic, and thermofoil, each offering different aesthetics and benefits.

Hardware: Pay attention to hardware options such as handles, knobs, and pulls. Choose hardware that not only complements the drawer fronts but also enhances functionality and ergonomics.

Customization: Explore customization options to tailor drawer fronts to your specific needs. Consider features like soft-close mechanisms, integrated handles, or custom sizing for a personalized touch.

Budget: Determine your budget for drawer fronts and choose options that offer the best value in terms of quality, durability, and aesthetics.

By giving careful thought to kitchen drawer fronts, you can enhance both the functionality and style of your kitchen. Whether you prefer a classic and elegant look or a sleek and modern design, the right drawer fronts can make a significant impact on your kitchen’s overall appeal and efficiency.

Simple and Effective Self-Massage Techniques for Relaxation and Relief

Massage Spa, infrared sauna, pre natal massage in New Jersey

Manava Therapy

In the hustle and bustle of daily life, finding moments of relaxation and relief is essential for our well-being. While a professional massage is a luxurious treat, you can bring the soothing benefits of massage into the comfort of your home with simple and effective self-massage techniques. In this guide, we explore easy-to-follow methods that can help you unwind, alleviate stress, and ease those nagging aches and pains.

  1. Stress-Busting Scalp Massage:

Technique:

Sit or lie down comfortably.

Use your fingertips to gently massage your scalp in circular motions.

Gradually move from the forehead to the back of your head, applying light pressure.

Focus on areas where tension tends to accumulate, like the temples and the base of the skull.

Benefits:

Relieves tension headaches and migraines.

Promotes relaxation by stimulating scalp nerves.

  1. Soothing Neck and Shoulder Release:

Technique:

Sit with a straight back or stand comfortably.

Use your fingertips or palms to massage the sides and back of your neck.

Move your hands down to your shoulders, kneading any tense muscles.

Perform gentle neck stretches by tilting your head from side to side.

Benefits:

Eases neck and shoulder tension from prolonged sitting or stress.

Improves flexibility and range of motion.

  1. Stress-Relieving Facial Massage:

Technique:

Apply a small amount of facial oil or moisturizer.

Use your fingertips to gently massage your forehead, temples, and jawline in circular motions.

Apply slight pressure to acupressure points around the eyes and on the sides of the nose.

Finish by lightly massaging your neck and collarbone.

Benefits:

Relaxes facial muscles, reducing tension and promoting a youthful glow.

Alleviates eye strain and sinus congestion.

  1. Calming Chest and Heart Space Massage:

Technique:

Sit comfortably with your back straight.

Use your fingertips to gently massage your chest in upward motions.

Focus on the area around your heart, using light pressure.

Incorporate deep breaths as you massage to enhance relaxation.

Benefits:

Relieves tightness in the chest and upper back.

Promotes a sense of emotional release and openness.

  1. Tranquil Hand and Wrist Massage:

Technique:

Sit with your hands comfortably resting on a surface.

Use your thumb to massage the palm of each hand in circular motions.

Gently stretch and massage each finger, paying attention to the joints.

Massage the wrists with light pressure using circular motions.

Benefits:

Alleviates tension from repetitive movements or computer use.

Improves flexibility and reduces stiffness.

  1. Relaxing Lower Back and Hip Release:

Technique:

Lie on your back with your knees bent.

Place a tennis ball under your lower back and gently roll over it.

Focus on areas of tension, applying gentle pressure.

Perform knee-to-chest stretches to release tension in the lower back and hips.

Benefits:

Relieves lower back pain and discomfort.

Enhances flexibility and reduces muscle tightness.

  1. Rejuvenating Foot Massage:

Technique:

Sit comfortably or use a tennis ball under your foot while seated.

Roll the ball under your foot, applying gentle pressure.

Use your thumbs to massage the arches and heels in circular motions.

Stretch and rotate your ankles to enhance the massage.

Benefits:

Eases foot fatigue and plantar fasciitis.

Promotes overall relaxation and grounding.

Conclusion: Nurturing Your Well-Being Through Self-Care

Integrating these simple and effective self-massage techniques into your routine can be a transformative act of self-care. Whether you are seeking relaxation, stress relief, or relief from minor aches and pains, these practices offer a rejuvenating escape within the confines of your home. Remember to listen to your body, breathe deeply, and allow the calming touch of your own hands to nurture your well-being. By embracing these self-massage rituals, you not only unlock physical benefits but also cultivate a deeper connection with your body, fostering a sense of balance and tranquility in your daily life.

At MaNaVa Advanced Massage Therapy, your comfort is our top priority. Schedule an appointment, or drop by today to begin your path to wellness!

Indulge in Decadence: A Symphony of Chocolate Delights

the clouds boutique, Chocolates in UAE

The Clouds Boutique

Chocolates, the exquisite confection that transcends time and culture, have an unparalleled ability to captivate our senses and evoke pure bliss. Crafted from the cocoa bean, each velvety bite tells a story of passion, precision, and a commitment to the art of flavor.

From the moment the rich aroma wafts through the air, tantalizing our taste buds, to the silky-smooth texture that melts on the tongue, chocolates are a celebration of sensory pleasure. The world of chocolates is as diverse as it is delectable, offering a kaleidoscope of flavors, textures, and pairings to suit every palate.

The Journey of Chocolate:

Cocoa Harvesting: The journey begins in tropical regions where skilled farmers cultivate and harvest cocoa beans, the soul of chocolate. Meticulous care in cultivation ensures the finest quality.

Bean to Bar Craftsmanship: Artisan chocolatiers transform raw cocoa beans into luxurious bars, each step guided by a passion for perfection. The careful roasting and grinding process unlocks the beans’ full flavor potential.

Diverse Flavors: Chocolates are a canvas for creativity, offering an array of flavors ranging from the classic purity of dark chocolate to the velvety sweetness of milk chocolate and the playful infusion of exotic ingredients like sea salt, fruit, or spices.

Texture Symphony: Explore the texture symphony of chocolates – the snap of a perfectly tempered bar, the creamy silkiness of truffles, or the satisfying crunch of chocolate-covered nuts. Each bite is an orchestrated experience.

Chocolates for Every Occasion:

Celebratory Elegance: Share a box of assorted chocolates to elevate celebrations, birthdays, and anniversaries. The vibrant assortment offers a journey of surprises, each piece a testament to the chocolatier’s artistry.

Expressing Love: In matters of the heart, chocolates convey sentiments with unparalleled sweetness. Heart-shaped truffles, adorned with edible gold, speak volumes of affection.

Gourmet Pairings: Chocolate is a versatile companion, pairing seamlessly with wine, coffee, or even cheese. The complex notes of premium chocolate elevate tasting experiences, making it an indulgence for connoisseurs.

Mindful Moments: In a fast-paced world, chocolates invite moments of mindfulness. A square of dark chocolate with a touch of sea salt becomes a luxurious pause, allowing the senses to savor the present.

A World of Sweet Euphoria

Whether embraced as a gesture of love, a moment of self-indulgence, or a sophisticated culinary experience, chocolates are a universal language of delight. From the simplicity of a single truffle to the complexity of artisanal creations, each chocolate creation is a symphony of flavor and a testament to the enduring allure of this timeless treat. Indulge, savor, and let the world of chocolates envelop you in sweet euphoria.

How To Add A Remote To Chamberlain Garage Door Opener – DoorJam Garage

Garage Door Repair Wake Forest NC is a simple process that allows you to conveniently control your garage door with ease.

Whether you’re setting up a new remote or adding an additional one, this comprehensive guide will walk you through the steps to ensure smooth operation of your garage door opener.

1. Check Compatibility

Before adding a remote to your Chamberlain garage door opener, verify that the remote is compatible with your opener model. Chamberlain remotes are designed to work with a wide range of Chamberlain, LiftMaster, and Craftsman garage door openers, but it’s essential to confirm compatibility to avoid compatibility issues.

2. Install Batteries (If Required)

If your Chamberlain garage door remote requires batteries, install them according to the instructions provided in the user manual. Ensure that the batteries are inserted correctly, with the positive and negative terminals aligned properly.

3. Locate the “Learn” Button

Most Chamberlain garage door openers feature a “Learn” button that is used to add remotes. This button is typically located on the motor unit of the opener near the antenna wire. It may be labeled as “Learn,” “Smart,” or “Program.” Consult your opener’s user manual or look for the button near the antenna wire.

4. Press the “Learn” Button

Once you’ve located the “Learn” button, press it firmly and release it. You’ll notice that the indicator light on the motor unit will begin to blink or change color, indicating that the opener is in programming mode and ready to learn the code from your remote.

5. Add the Remote

Next, follow these steps to add your remote to the Chamberlain garage door opener:

  • Press and hold the button on the remote that you want to add. Hold the button down until you see the indicator light on the remote flash or hear a beep. This indicates that the remote’s code has been transmitted to the garage door opener.
  • Some Chamberlain remotes may require you to enter a specific code sequence or follow additional instructions. Refer to your remote’s user manual for detailed programming instructions.

6. Test the Remote

After adding the remote, it’s essential to test it to ensure that it’s working correctly. Stand inside your garage and press the button on the remote. If the programming was successful, your garage door should open or close smoothly in response to the remote’s command.

7. Repeat for Additional Remotes (If Necessary)

If you have multiple Chamberlain garage door remotes that you want to add, simply repeat the process outlined above for each remote. Press the “Learn” button on the opener, then add each remote individually, and test each one to ensure that they’re all functioning correctly.

8. Secure Your Remote

Once you’ve added your Chamberlain garage door remote, be sure to keep it in a safe and secure location, such as your car’s glove compartment or a designated spot inside your home. Avoid leaving the remote in plain sight, where it could be easily stolen or accessed by unauthorized individuals.

Conclusion:

Adding a remote to your Chamberlain garage door opener is a straightforward process that allows you to enjoy convenient access to your garage. By following the steps outlined in this guide and consulting your opener’s user manual for specific instructions, you can quickly add your remote and ensure smooth operation of your garage door opener. If you encounter any difficulties during the process, don’t hesitate to reach out to Chamberlain’s customer support or consult a professional for assistance.

DoorJam Garage

3418 Quarry Rd, Wake Forest, NC 27587, United States

1-919-906-6623

How To Reset A Garage Door Keypad – New Braunfels Garage Door Repair

Garage Door Repair New Braunfels TX provides convenient access to your garage without the need for a physical key or remote transmitter. However, there may be times when you need to reset the keypad, such as when changing the access code or troubleshooting keypad malfunctions.

In this comprehensive guide, we’ll walk you through the step-by-step process of resetting a garage door keypad, providing detailed instructions and helpful tips along the way.

1. Locate the Reset Button

Most garage door keypads have a reset button that allows you to erase the existing access code and program a new one. The reset button is typically located on the back or inside the keypad cover, although its exact location may vary depending on the brand and model of your keypad. Refer to the manufacturer’s instructions or consult the keypad’s user manual to locate the reset button.

2. Access the Keypad

To access the reset button, you’ll need to open the keypad cover or housing. Depending on the design of your keypad, this may involve removing screws, sliding a cover open, or pressing release tabs. Use a screwdriver or your fingers to open the cover and expose the keypad’s interior components.

3. Press and Hold the Reset Button

Once you’ve located the reset button, use a small tool or your finger to press and hold the button. Hold the reset button down for several seconds until you see the keypad’s indicator lights flash or hear a confirmation beep, indicating that the reset process has begun. Continue holding the reset button until the lights stop flashing or the beep stops.

4. Release the Reset Button

After holding the reset button for the specified duration, release the button and wait for the keypad to reset. The reset process may take a few moments to complete, during which the keypad will erase the existing access code and return to its default settings.

5. Program a New Access Code

Once the keypad has been reset, you can program a new access code to secure your garage. Follow these steps to program a new access code:

  1. Enter the manufacturer’s default access code (often found in the keypad’s user manual) to enter programming mode.
  2. Follow the keypad’s programming instructions to enter a new access code of your choice. Typically, this involves pressing a series of buttons in a specific sequence.
  3. After entering the new access code, wait for the keypad to confirm the programming with a series of indicator lights or beeps.
  4. Test the new access code by entering it on the keypad and verifying that the garage door opens and closes as expected.

6. Close the Keypad Cover

Once you’ve programmed the new access code, close the keypad cover or housing to protect the keypad’s internal components from dust, debris, and weather exposure. Ensure that the cover is securely closed and latched to prevent damage to the keypad.

7. Test the Keypad

After resetting and programming the keypad, test it to ensure that the new access code works properly. Enter the new code on the keypad and observe the garage door’s response. If the door opens and closes as expected, the reset process was successful.

8. Troubleshooting Tips

If you encounter any issues during the reset process or programming, try the following troubleshooting tips:

  • Ensure that you’re following the correct steps for your specific keypad model.
  • Verify that the keypad’s batteries are properly installed and fully charged.
  • Check for any physical damage or debris obstructing the keypad buttons or reset button.
  • Consult the keypad’s user manual or manufacturer’s website for additional troubleshooting guidance.

By following these step-by-step instructions and troubleshooting tips, you can reset your garage door keypad with ease and ensure secure access to your garage.

New Braunfels Garage Door Repair

 3702 I 35 Frontage Rd Unit 112, New Braunfels, TX 78132, United States

1-830-387-9855

How To Change Code On Garage Door Keypad – Martin Garage Door

Garage Door Repair Parker CO is a simple yet effective way to enhance the security of your home and protect your belongings. Whether you’ve recently moved into a new home, need to update your existing keypad code, or want to revoke access for individuals who no longer require entry, changing the code on your garage door keypad allows you to maintain control over who can enter your garage.

In this comprehensive guide, we’ll walk you through the step-by-step process of changing the code on a garage door keypad, ensuring that you can do so quickly and easily.

1. Locate the Keypad

The first step in changing the code on your garage door keypad is to locate the keypad itself. Garage door keypads are typically mounted on the exterior of the garage door frame, near the entrance to the garage. They may be attached to the wall surface or recessed into the frame, depending on the model and installation method.

2. Access the Programming Menu

Once you’ve located the keypad, you’ll need to access the programming menu to change the code. This usually involves entering a specific sequence of numbers or pressing a designated button on the keypad to enter programming mode. Refer to the user manual for your specific keypad model for instructions on accessing the programming menu.

3. Enter the Current Code (If Required)

If your garage door keypad requires you to enter the current code before changing it, do so now. This step verifies that you have authorized access to the keypad programming menu and prevents unauthorized individuals from changing the code without permission.

4. Select a New Code

With the keypad in programming mode, you can now select a new code for your garage door keypad. Choose a code that is easy for you to remember but difficult for others to guess. Avoid using obvious combinations such as sequential numbers or repeating digits, as these can compromise the security of your garage.

5. Enter the New Code

Once you’ve selected a new code, enter it into the keypad using the numeric keypad. Some keypads may require you to confirm the new code by entering it a second time to ensure accuracy. Follow the prompts on the keypad display or listen for audible feedback to confirm that the new code has been accepted.

6. Test the New Code

After changing the code on your garage door keypad, it’s important to test the new code to ensure that it works correctly. Stand within range of the keypad and enter the new code using the numeric keypad. The garage door should open or close in response to the code input, indicating that the new code has been successfully programmed.

7. Secure the Keypad

Once you’ve confirmed that the new code works correctly, secure the keypad to prevent unauthorized access. This may involve locking the keypad cover or activating a security feature that prevents entry after multiple incorrect code attempts. Refer to the user manual for your specific keypad model for instructions on securing the keypad.

8. Keep the Code Confidential

Finally, remember to keep the new code confidential and only share it with individuals who require access to your garage. Avoid writing down the code or sharing it with others unnecessarily, as this can compromise the security of your garage and home.

9. Periodic Code Changes

For added security, consider changing the code on your garage door keypad periodically, such as every six months or annually. This practice helps prevent unauthorized individuals from gaining access to your garage and reduces the risk of security breaches.

10. Seek Professional Assistance if Needed

If you encounter difficulties or have concerns about changing the code on your garage door keypad, don’t hesitate to seek professional assistance. Contact a reputable garage door technician or the manufacturer of your keypad for guidance on changing the code safely and effectively.

By following these steps and exercising proper caution, you can successfully change the code on your garage door keypad, enhancing the security of your home and providing peace of mind knowing that your garage is protected against unauthorized access.

Martin Garage Door

10411 S Parker Rd, Parker, CO 80134, United States

1-303-663-1310

How Open Garage Door Without Power – EDM Garage Doors, LLC

Garage Door Repair Volo IL can occur unexpectedly, leaving you unable to operate your garage door using its electric opener. While this situation may seem daunting, there are several methods you can employ to manually open your garage door without power.

Whether you’re facing a temporary power outage or simply prefer to have a backup plan in place, knowing how to open your garage door manually can come in handy when you least expect it. In this guide, we’ll explore various techniques for opening a garage door without power, ensuring that you can access your garage even in the absence of electricity.

1. Locate the Emergency Release Cord

Most garage door openers are equipped with an emergency release cord, also known as a manual release mechanism. This cord is typically red and hangs from the garage door opener track near the center of the garage ceiling. Its purpose is to disengage the opener from the door, allowing you to manually operate the door in the event of a power outage or malfunction.

2. Pull the Emergency Release Cord

To manually open your garage door, locate the emergency release cord and pull it down firmly in the direction of the door. This action will disengage the opener carriage from the door, enabling you to manually lift the door without resistance from the motor.

3. Lift the Garage Door Manually

Once you’ve pulled the emergency release cord, proceed to lift the garage door manually. Place your hands on the bottom edge of the door, lift it carefully, and guide it along its tracks as you raise it to the fully open position. Exercise caution and be mindful of the door’s weight, especially if it’s a larger or heavier door.

4. Secure the Door in the Open Position

After manually opening the garage door, it’s essential to secure it in the fully open position to prevent it from closing unexpectedly. Use locking mechanisms or clamps to hold the door in place, ensuring safety and peace of mind until power is restored.

5. Exercise Caution When Operating Manually

While manually operating your garage door without power, it’s crucial to exercise caution and follow proper safety procedures. Avoid placing your fingers or hands near moving parts, such as hinges and rollers, to prevent injury. Additionally, be mindful of the door’s weight and take necessary precautions to avoid strain or accidents.

6. Consider Installing Backup Power

To prevent future inconvenience during power outages, consider installing a backup power source for your garage door opener. Backup power options, such as battery backup systems or generators, can provide peace of mind and ensure uninterrupted access to your garage, even when the power is out.

7. Perform Regular Maintenance

To ensure the smooth operation of your garage door, it’s essential to perform regular maintenance and inspections. Keep the tracks clean and free of debris, lubricate moving parts as needed, and check the condition of springs, cables, and rollers regularly. By maintaining your garage door properly, you can minimize the risk of malfunctions and ensure reliable operation when you need it most.

8. Test the Manual Release Mechanism

Periodically test the manual release mechanism of your garage door opener to ensure that it functions correctly. Pull the emergency release cord and attempt to open the door manually to verify that the mechanism disengages smoothly and the door operates without resistance.

9. Consider Upgrading to a Manual Garage Door

If you frequently experience power outages or prefer a simpler alternative, consider upgrading to a manual garage door system. Manual garage doors operate without the need for electricity or motorized openers, providing a reliable and straightforward solution for accessing your garage.

10. Seek Professional Assistance if Needed

If you encounter difficulties or safety concerns while attempting to open your garage door manually, don’t hesitate to seek professional assistance. Contact a reputable garage door technician to inspect and repair any issues with your garage door system, ensuring safe and reliable operation in the future.

By following these steps and implementing proper safety precautions, you can effectively open your garage door without power and ensure continued access to your garage during unexpected outages. Whether you rely on your garage for vehicle storage, home access, or storage space, knowing how to operate your garage door manually provides invaluable peace of mind and convenience.

EDM Garage Doors, LLC

596 Richard Brown Blvd, Volo, IL 60073, United States

1-847-416-3036

Can I Use My Garage Door Opener Without The Sensors – Garage Door Wizard

Garage Door Repair Cypress TX are integral components of modern homes, offering convenience and security by allowing effortless access to the garage.

However, many homeowners may wonder whether it’s possible to operate their garage door opener without sensors. In this comprehensive guide, we’ll explore the functionality and safety implications of using a garage door opener without sensors, as well as alternative solutions to ensure safe and reliable operation.

Understanding Garage Door Opener Sensors

Garage door opener sensors, also known as photoelectric sensors or safety sensors, are essential safety features designed to prevent accidents and injuries by detecting obstructions in the path of the closing garage door. These sensors typically consist of a transmitter and a receiver, mounted on opposite sides of the garage door opening near the floor. When the garage door is closing, the transmitter emits an infrared beam that is detected by the receiver. If an obstruction interrupts the beam, the sensors signal the opener to stop and reverse the door’s movement, preventing damage or injury.

Can You Use Your Garage Door Opener Without Sensors?

While it may be technically possible to operate a garage door opener without sensors, doing so poses significant safety risks and may compromise the functionality of the opener. Garage door opener sensors are not optional features—they are mandated by federal safety regulations in most jurisdictions to prevent accidents and injuries. Attempting to bypass or disable the sensors can result in serious consequences, including property damage, personal injury, and legal liabilities.

Safety Implications of Operating Without Sensors

Operating a garage door opener without sensors can have serious safety implications for you, your family, and your property. Without sensors to detect obstructions in the door’s path, there is a risk of the door closing on objects, vehicles, or people, causing damage or injury. Additionally, modern garage door openers are equipped with built-in safety features that rely on the proper functioning of sensors to operate safely, such as auto-reverse mechanisms and force-sensitive controls. Disabling the sensors can render these safety features ineffective, increasing the risk of accidents and injuries.

Alternative Solutions

Rather than attempting to use a garage door opener without sensors, homeowners should prioritize safety and explore alternative solutions to address sensor-related issues:

1. Sensor Adjustment or Repair

If your garage door opener sensors are malfunctioning or misaligned, it’s essential to address the issue promptly to ensure safe and reliable operation. Adjusting the sensors to correct alignment or repairing any damaged components can restore their functionality and prevent safety hazards.

2. Sensor Replacement

If your garage door opener sensors are old, damaged, or beyond repair, consider replacing them with new, modern sensors that comply with current safety standards. New sensors are affordable and readily available from garage door opener manufacturers and retailers, ensuring reliable performance and peace of mind.

3. Professional Inspection and Maintenance

Regular inspection and maintenance of your garage door opener system by a qualified technician can help identify and address sensor-related issues before they escalate into safety hazards. Professional technicians have the knowledge, skills, and tools to diagnose and repair sensor problems effectively, ensuring safe and trouble-free operation of your garage door opener.

Conclusion:

While it may be tempting to operate a garage door opener without sensors to bypass sensor-related issues, doing so is not only unsafe but also illegal in many jurisdictions. Garage door opener sensors are critical safety features designed to prevent accidents and injuries, and disabling them can have serious consequences. Instead of compromising safety, homeowners should prioritize sensor maintenance, repair, or replacement to ensure safe and reliable operation of their garage door opener.

Garage Door Wizard

17302 House & Hahl Rd Suit 208, Cypress, TX 77433, United States

1-832-373-7681

What Are The Benefits Of Epoxy Coating For Garage Floors? – The Garage Floor Company Omaha


Garage Floor Omaha NE is a popular choice among homeowners due to its numerous benefits and advantages.

From enhancing the appearance of the garage to providing long-lasting durability, epoxy coating offers a range of benefits that make it an ideal option for garage flooring. Let’s explore some of the key advantages of epoxy coating in detail:

1. Durability: One of the primary benefits of epoxy coating is its exceptional durability. Epoxy is a resilient material that can withstand heavy foot traffic, vehicle traffic, and various types of impact without showing signs of wear and tear. It creates a tough, protective layer over the concrete surface, effectively guarding it against damage from abrasion, chemicals, and stains.

2. Resistance to Chemicals: Epoxy coating is highly resistant to chemicals such as gasoline, oil, grease, and other common automotive fluids. This resistance makes it an ideal choice for garage floors, where exposure to these substances is frequent. The seamless, non-porous surface of epoxy prevents chemicals from penetrating the concrete, making cleanup quick and easy.

3. Enhanced Appearance: Another significant benefit of epoxy coating is its ability to enhance the appearance of the garage floor. Epoxy comes in a variety of colors, patterns, and finishes, allowing homeowners to customize the look of their garage to suit their preferences. Whether you prefer a glossy finish or a more subtle matte appearance, epoxy coating can transform the aesthetic of your garage.

4. Improved Safety: Epoxy coating can improve safety in the garage by creating a slip-resistant surface. Many epoxy coatings include additives such as silica or aluminum oxide, which provide traction and reduce the risk of slips and falls, especially in areas prone to moisture or spills. This is particularly important in a garage where safety is paramount.

5. Easy to Clean and Maintain: Maintaining an epoxy-coated garage floor is a breeze. The smooth, non-porous surface of epoxy makes it resistant to stains, dirt, and debris. Spills can be easily wiped up with a cloth or mop, and regular sweeping or vacuuming helps keep the floor looking clean and pristine. Unlike bare concrete, which can absorb stains and require frequent scrubbing, epoxy-coated floors are low-maintenance and easy to clean.

6. Longevity: When properly installed and maintained, epoxy coating can last for many years, providing long-term protection for your garage floor. Unlike other flooring options that may need to be replaced or refinished periodically, epoxy coating is durable and resilient, offering lasting performance and value.

7. Cost-Effectiveness: While the upfront cost of installing epoxy coating may be higher than some other flooring options, its long-term durability and low maintenance requirements make it a cost-effective choice over time. By investing in epoxy coating for your garage floor, you can avoid the expense and hassle of frequent repairs or replacements associated with inferior flooring materials.

8. Resistance to Moisture: Epoxy coating creates a waterproof barrier that helps protect the underlying concrete from moisture damage. This is particularly beneficial in regions with high humidity or where the garage is subject to moisture infiltration. By preventing moisture from seeping into the concrete, epoxy coating helps extend the lifespan of the garage floor and prevents issues such as cracking or spalling.

9. UV Resistance: Some epoxy coatings are formulated with UV inhibitors that help protect the floor from fading or yellowing when exposed to sunlight. This UV resistance ensures that the vibrant color and finish of the epoxy coating remain intact over time, even in outdoor or partially exposed garage environments.

10. Quick Installation: Epoxy coating can be applied relatively quickly compared to other flooring options. Depending on the size of the garage and the condition of the existing floor, installation can often be completed in just a few days. This means minimal disruption to your daily routine and faster enjoyment of your newly upgraded garage space.

In summary, epoxy coating offers a wide range of benefits for garage floors, including exceptional durability, resistance to chemicals, enhanced appearance, improved safety, easy maintenance, longevity, cost-effectiveness, resistance to moisture and UV rays, and quick installation. Whether you’re looking to protect and beautify your garage or create a functional workspace, epoxy coating is an excellent choice that delivers lasting value and performance.

The Garage Floor Company Omaha

15125 Industrial Rd, Omaha, NE 68144, United States

1-402-576-5599

How Do I Program A Craftsman Garage Door Opener – Tarrant County Door & Gate


Garage Door Repair Fort Worth TX is a straightforward process that typically involves a few simple steps.

Before diving into the programming, it’s essential to gather all the necessary materials and familiarize yourself with the components of your garage door opener system. Here’s a detailed guide on how to program a Craftsman garage door opener:

1. Gather Materials:

  • Craftsman garage door opener manual
  • Stepladder (if needed)
  • Remote control for the garage door opener

2. Understand Your Garage Door Opener:

  • Familiarize yourself with the different components of your Craftsman garage door opener system. Locate the motor unit, which houses the “Learn” button, and identify the remote control you’ll be programming.

3. Locate the “Learn” Button:

  • The “Learn” button is a crucial component for programming your Craftsman garage door opener. Depending on the model, this button could be located on the back or side of the motor unit. Refer to your manual if you’re unsure about its location.

4. Clear Previous Programming (if necessary):

  • If you’re reprogramming a remote control or adding a new one, it’s essential to clear the previous programming first. You can typically do this by holding down the “Learn” button until the indicator light on the motor unit blinks or changes color.

5. Prepare the Remote Control:

  • Make sure the remote control you’re programming is ready for the process. Remove any battery covers and locate the programming button on the remote.

6. Enter Programming Mode:

  • Press and release the “Learn” button on the garage door opener motor unit. This action puts the opener into programming mode, indicated by a blinking or illuminated light. You typically have around 30 seconds to complete the programming process.

7. Program the Remote:

  • Press and hold the programming button on the remote control until the indicator light on the motor unit blinks again. This blinking light signifies that the remote has been successfully programmed with the garage door opener.

8. Test the Remote:

  • Press the button on the remote control to test if the garage door opener responds accordingly. If programmed correctly, the door should either open or close as expected.

9. Repeat if Necessary:

  • If you have multiple remote controls or additional features to program (such as a keypad or keyless entry), repeat steps 5-8 for each device.

10. Finalize Programming:

  • Once all remote controls and additional features are successfully programmed, press the “Learn” button on the motor unit again to exit programming mode.

11. Verify Functionality:

  • Test each programmed device, including remote controls, keypads, and any other accessories, to ensure they operate the garage door opener correctly.

12. Document and Store Information:

  • Keep a record of the programming steps and which devices are programmed for future reference. Store your Craftsman garage door opener manual and any programming instructions in a safe and accessible place.

By following these detailed steps, you should be able to program your Craftsman garage door opener and any accompanying remote controls or accessories with ease. If you encounter any issues during the programming process, refer to your manual for troubleshooting tips or contact Craftsman customer support for assistance.

Tarrant County Door & Gate

6408 Marlette Ct, Fort Worth, TX 76182, United States

1-817-456-2958

Page 2 of 72

Powered by WordPress & Theme by Anders Norén